Showing posts with label Sharon's books. Show all posts

Tuesday, April 30, 2013

Spring is in the Bag

Braided Spring Bag
8" x 12"
© 2013 Sharon V. Rotz

It's time for me to put away the drab and carry a perky new bag.


I had fun choosing fabrics for this bright and cheery bag. 
Because the colors show more than the fabric print, this is a great way to use fabrics in a different way.  Will you choose a dramatic print, a hand-dyed solid, a subtle print or a combination of all three?


The print can add a lot of variety depending on how the fabric was cut.


A combination of three green fabrics creates a softer charm.


The solid fabric became more dramatic with the addition of a green yarn braided in.

Come on Spring. Is this what you have been waiting for?  I'm ready!

Techniques for for this bag and similar braided bags can be found in my book 
"Braidcraft, Designer Bags and Totes" 
and can be purchased through Herrschners, Inc.


Tuesday, April 9, 2013

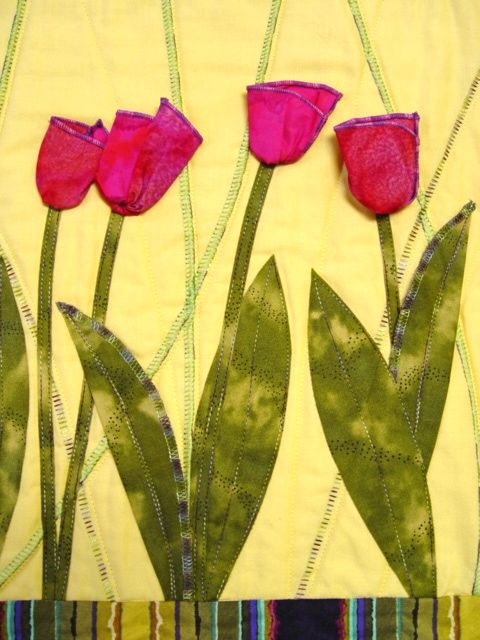
Tulips "Springing" Up


In the year of the un-ending winter in central Wisconsin, I feel that my only option for seeing spring flowers is to fall back to those created from fabric.


These three-dimensional tulips are made on my serger using the rolled edge stitch. The background detail is created using a flat lock serger stitch. 

This pattern "Down the Pathway" can be found in my book, Serge and Merge Quilts.


On this dark day with the prediction of yet another snowfall, I have a bright and cheery garden inside my home.


Friday, November 9, 2012

Leaf Around a Bit More


Here is another idea to go along with the fall leaves stitched to the edge of the coaster in my previous post.

Make additional leaves and attach them to the ends of a wide ribbon. The ribbons are then tied around pillows to lend a seasonal touch to the pillows.

Wouldn't these be perfect for my Thanksgiving celebration?


Tuesday, November 6, 2012

Leaf It Up a Bit

Leafy Coaster
©Sharon V. Rotz

Although this is a bit away from my other Quilter's Tiles, it is close in size and so appropriate for the season. This coaster would be perfect for that relaxing cup of coffee or second piece of pie after your Thanksgiving gala.  


These coasters are decorated with flannel and felt leaves made using the autumn leaves we have gathered as patterns. (Better get those leaves quickly as today light snow is beginning to fall here.)  

Complete directions for this project are in my book Quilting Through the Seasons available on my website.

Friday, October 19, 2012

It's Bittersweet Friday


The trailing vines and bright orange berries of the bittersweet caught my attention several times as I walked along the roadside.  When I was working on Forest Floor, I couldn't resist adding them into the inner border of the quilt.

Forest Floor
©Sharon V. Rotz


This quilt combines solid blocks of a leafy print with my skewed log cabin "freedom blocks".  The bittersweet vines are appliqued with rickrack trim on the berries. 
Instructions are in 

Tuesday, August 28, 2012

Tuesday's Tile - Is your Serger a Quilting Tool?

Quilter's Tile - Playtime
8" x 8"
©2012 - Sharon V. Rotz

Are you a serger owner? If you are, do you see your serger as one of your quilting tools? 

With the rapid speed of your serger, you can quickly piece your quilts. I've had fun zipping through my piecing. I've also found that I like the added detail I get when the serging is done on the front of the quilt.


Normally we stitch our seams with right sides together, but if you like the look of the serging showing on the front of your project you will start with fabrics wrong sides together.


You will be creating a seam allowance on the front side of the fabrics rather than on the back side.


When the seam is pressed open, the serged seam is showing.


With a detailed photo, you can see the color and thread accenting the pieced squares of this simple block.

Looking for more ideas for combining serging and quilting? I invite you to explore the ideas found in my book "Serge and Merge Quilts".

Dust off your serger and use it as your newest quilting tool. What will you make? 


Friday, June 29, 2012

From Braiding Hair to Braiding Bags


I am excited to share my newest designs for braiding, not hairstyles, but Designer Bags and Totes.  


Learn how to use simple fabric braids, in this case with a stand of yarn added in,


coil them into shape,


and create a trendy fashion bag ready for a special outing.

Shown is "Night on the Town".

The book and braidcrafting tools are available through Herrschners, Inc.

Friday, June 22, 2012

What Charms You?

Thirteen's a Charm
56" x 80"
©2008 Sharon V. Rotz


Do your quilts make you happy? Do you have a favorite quilt that puts a smile on your face every time you looks at it?

I have to admit that "Thirteen's a Charm" is one of my favorites. This quilt has woven itself around my heart and continues to brighten each day. I love the intermixing of bright colors and lively patterns.


It is made by serging fabric strips together in sets.  By stitching with the fabrics wrong sides together instead of the normal method of right sides together, the serged seams will be on the outside of the quilt top adding extra detail to the quilt.


The pieced strips are cut into triangles and then pieced with triangles cut from the various fabrics.

This project and other serged quilts can be found in my book Serge and Merge Quilts.


Friday, May 25, 2012

More Friday Stitching

Dancing Log Cabins detail
©2012 Marlyn Butchins

I am always inspired by the quilters I meet (through the internet or in person) and the quilts that they make. Recently, Marlyn from Israel sent me a photo her quilt "Dancing Log Cabins". She mentioned that she has a new Janome 7700 with more than 240 embroidery stitches. I'm delighted that she chose to try out those stitches on the sashing of Dancing Log Cabins.


To quote Marlyn, 

"To me it is a quilt filled with taking chances, passion, and lots of cheeky statements,
excitement, vibrancy and all the things that make me feel good. This is how I want a quilt to make me feel, and this one certainly does it."


I am so happy that Marlyn used my book, Log Cabin Quilts with Attitude, for her inspiration.  

Find the freedom of using for your scrap strips in these fun-loving skewed log cabin blocks.  Feel free to disregard perfect seam allowances and forget about matching corners as you combine fabrics without fretting.

Note:  Thanks to Marlyn for sharing her quilt. Please follow the link to find out more about Marlyn and The Dizengoff Memorial Quilt.


Friday, March 30, 2012

RickRack Out of the Box

La Bohemia
51" x 51"
by Sharon V. Rotz

As a previously posted, I started with a collection of rickrack from my mother and my collection has grown from there. I questioned whether to use my vintage rickrack but I have grown fond of this zigzagging little trim. I found my local store can keep me supplied so on my quilts it goes.


In La Bohemia, I went all out incorporating rickrack in many areas of the quilt. It added detail between appliques flowers.


It was used to made three dimensional centers for the flowers.


Rickrack created a wing for the bird.


By inserting coordinating rickrack in the seam, a subtle detail is revealed.


A contrasting rickrack adds to the bound quilt edge.


The pattern for La Bohemia and other quilts (many with rickrack details) are found in my book, 
Log Cabin Quilts with Attitude.

How have you used rickrack or other trims in your quilts? Have you opened up this world of opportunity?


Friday, February 11, 2011

Pillows, Pillows, Over the Top

How could I NOT include a serged pillow in my pillow collection?  Although I have more, these favorites lead the way.  Could it be that I just can't resist the bright colors and exciting fabric designs? You can be the judge.

After finishing my quilt "Thirteen's a Charm", included in Serge and Merge Quilts, I fortunately had a few pieces left over. Since this quilt is one of my very favorites, I wanted to add to its splendor by accenting it with pillows. Four blocks became a pillow top and a few of the fun prairie points poke out of the pillow edge.

And still I had fabric left, how lucky was I? Not enough to make more of the same design, another break.  I had the opportunity to once again think in a new direction.  What new design would work with my serged strips?


I decided to crosscut the strips into bars, various widths to add variety. What fabric could be added between?  Perhaps a crisp white for a sharp, fresh look. This seemed to be working.


Yes, indeed, I was more than pleased with my Serged Bar Pillows. They are, without a doubt, my new favorite especially when I add my "Thirteen's a Charm" pillow.


And, with that addition, the pile got just too high and my pillow world came tumbling down.


Wednesday, February 9, 2011

Pillows Reaching the Sky


Yes, we are reaching the sky. The pillows are precariously perched and we are still moving on.

We have looked are various pillow edges but one we have not encountered is the flanged pillow. This flange can be compared to a "flat ruffle", (if that even makes sense) and gives a more contemporary look.


The"Joy Patchwork Pillow" from Quilting Through the Seasons is finished with a flange.  It certainly adds to the pillow, both in size and in design. This looks like a complicated finish for a pillow and the first time I tried this, I did make it, oh, so hard.  I made four sides and stitched them into a frame and then tried to figure out how to add them to the sides of my pillow. EEK, what problems, I had.

Today, I can tell you a simple way to achieve this look. Think of the pillow top as the center of a quilt and add four (pieced) borders onto the "quilt top".  

Measure the "quilt top" (3" border, 12" center, 3" border plus seam allowance, 1/2" equals 18-1/2") and construct your back this size. Make your pillow back with an center overlap (envelope style) and pin right sides together to the pillow front. Stitch around the pillow. 

Turn the pillow to the right side through the overlapped back closure. Press. Stitch in the ditch between the patchwork borders and the pillow center to form the flange pillow edge.


Monday, February 7, 2011

How High Can the Pillows Go?

While we are savoring our Packers victory in the Super Bowl, I am still piling pillows up higher and higher.

Today, I've gathered my scraps strips. We often have extra strips of fabrics left over when we work on a project. These become orphans in our stash, too good to throw away and not enough to make anything. When my pile of strips gets big, I start making "freedom blocks", log cabin blocks of various colors and width of strips. These are recut to a common size and make wonderful, zany quilt blocks. The full instructions are in my book, Log Cabin Quilts with Attitude.


To go even further, you can make a lively butterfly pillow to brighten your room and coordinate with your bed quilt. Four blocks were made from excess strips from the quilt. These were cut into rectangles and stitched into a four-patch. I added a bit of rickrack on the to edge of the pillow as I stitched the front and the back together. A wired ribbon is wrapped around the pillow and ends are twisted to make the butterfly antennas.


Today, take a look at your scraps and see what you can make.

Saturday, February 5, 2011

Piling Pillows Higher and Higher

Making a pillow can be a small experiment with creativity. Perhaps, you want to try a technique without working on a grand project.


I love crazy quilts but never have the time or enough of the fabrics, the velvets and silks, to make a large quilt. Making a crazy quilt pillow was the solution for me. I thoroughly enjoyed the patchwork and the hand embroidery stitching. I have my small pillow completed but I'm still dreaming of that large crazy quilt I will make someday in the future.


Sunshine and warm summer days, these are the ideas that came to mind when I saw this gay sunflower fabric. Why not decorate with a giant sunflower and bring the summer day inside my home? This pillow became the star with a cast of "Sunflower Cube" pillows and of course, a wall quilt to match. My, did I really work backward, making the pillows first and then the quilt? Instructions for this project are in my book, Quilting Through the Seasons.


As you can see the pillow pile is reaching ever upward. 

Monday, January 31, 2011

Sparkle Your Decor with Pillows

Snowball Fight Bed Quilt
80" x 94"
Sharon V. Rotz

After many years of working with decorators making custom soft furnishings, I've grown to love the sparkle pillows can give to your room. I thought it would be fun to look at a number of pillow ideas.

A pillow idea can be as simple as making an extra block from your quilt. These pillows named "Throw Snowball Pillows" laughingly refer to what often happens to them in a lively household. An extra block from the quilt border makes a fast quilted pillow top. Add a solid border to size it for a standard purchased pillow form and you can finish in a snap.

The instructions for making "Throw Snowball Pillows", "Snowball Pillowcases" and the "Snowball Fight Bed Quilt" are all in my book, Quilting Through the Seasons.

How have you decorated with quilted pillows?  Share your ideas by commenting to this post.

I'll be back with more pillows, pillows, pillows.

Wednesday, October 6, 2010

Whirling and Twirling, the top is done


The blocks are done and arranged and I've completed the quilt top. A random layout of log cabin blocks and solid blocks seemed the right combination for this colorful, carefree quilt.

After piecing the log cabin blocks, they were cut to size on a angle. (Further information on this technique can be found in earlier posts and in my book "Log Cabin Quilts with Attitude".) This gives great movement to the blocks. Does this remind you of gaily dressed dancers whirling around? Or maybe those autumn leaves fluttering in the wind as they fall to the ground? To me, it is definitely color in motion.

To further obscure the edges of the blocks, you can choose an outside strip of fabric that matches the solid blocks. (You can see this in the bottom of the center block.) The static look of block to block matching disappears as an outcome.

Now its time for choosing a backing and layering it up for the quilting.
Related Posts Plugin for WordPress, Blogger...