Showing posts with label bysher patterns. Show all posts

Monday, September 15, 2014

My Obsession Continues

My Softer Side
©2014 Sharon V. Rotz

Yes, my rickrack box is not empty 
and I am dreaming up more projects to incorporate my bountiful supply.

Feeling my softer side, 
(usually I pick the brightest fabrics)
I've selected a collection of delicate pinks and greens for this quilt.

The blocks are very traditional quarter square triangle blocks made up on a variety of pink prints. These blocks are set off by a sashing of a soft green stripe. 
On the two-part sashing, the rickrack shines as it outlines the melon shapes.


To make the rickrack trimmed shapes, 
I cut the half melon and stitched the rickrack on the outer edge of the right side of the fabric.


The seam allowance was pressed to the back along with the outer half of the rickrack. This left a finished edge that was easy to appliqué to the sashing by stitching in the ditch 
(the line formed by the folded fabric edge and the rickrack).


A melon shape was appliquéd to each sashing half-strip.


 The two sashing strips were then stitched together and added between the blocks. 

Now that my softer side was had a go, 
my bright side wants to give it a try. 

Will I hold back
 or will the next project be knock your socks off bright? 


Thursday, September 4, 2014

ZigZagging All Over

String Breeze
Sharon V. Rotz

As you can see I am on a Rick rack roll. 
There are so many places that I've found to incorporate it into my work.


From Flower edges


  to flower stems


to tucking it into the binding edge.


The pattern for "String Breeze" is 
available here.


Wednesday, January 29, 2014

Rod Pocket Added, Label On, Finished


I've been finding more and more reasons to avoid finishing my quilt "Where Is Cornelia?" My latest thought was to add some of the swirly fabric to the edges of the design. So I've been busy cutting sections of the fabric and placing them around the quilt. (Keeping in mind that I still wanted to use this limited fabric for the binding, I had to be a bit careful not to cut it up completely.)


This was the final decision. Fusible adhesive was added to the back of the pieces. They were re-trimmed to clean up the edges and fused in place.  


The piece was quilted and the binding added. 
Finished.
Or so I thought.  

Hm.......Maybe a few beads added to the edge?


A pair of under-loved earrings was sacrificed and dismantled. The color was too good to pass up.

NOW, I done!

Rod pocket added. Label on.


it is available for purchase on my website.

Tuesday, January 21, 2014

"Where Is Cornelia?"

Hi, I am continuing to work on my "Where Is Cornelia?" wall hanging.

After using colored pencils in the background of my "Where Is Cornelia?" quilt, I found matching metallic thread and added some stitching on the edge of the flowers. 


They are already fused onto the background so the stitching is only ornamental. (See all the things you can do to avoid actually finishing a project!)


My next search was for interesting, complimentary fabric that I could use for a binding. I came up with this after rejecting several other choices. The curving lines seem to add to the center design without competing with it. So, on I go.

But.....


Wait!


The fact that the fabric was cut along some of the swirls inspired me to start thinking in a new direction. What if I added some of the swirls to the edge of the design? 
(Yes, I know, another way to prolong finishing it!)

Maybe next week????


If you are interested in making your own version of 
it is available for purchase on my website.


Wednesday, January 8, 2014

Stepping Up

I've been taking some steps to meet my goals for 2014. They may be baby steps, but even baby steps will add up if I keep with it.


I did get the new needle into my machine. By the way, my machine was happy, happy, happy especially after I used my old needle to repair snow pants. (Yes, it was a big fat minus degrees again today, -16 degrees, I believe,)


And I cleaned my machine. 
It always pays to have quality tools. 
I can't believe with all of my better brushes, this one is still around.


This shelf certainly deserved make-over. 


Even tiny improvements brighten my day.

When cleaning the shelf I found (surprise) a small wall quilt, "Where Is Cornelia?" that wasn't finished. 


Now, I am having fun trying something new. I am adding color to the background with colored pencils.


This could open up new doors for exploring future quilting projects.

Oh yes, about that unquilted top.... well, I did buy a quilt batt. That was a positive step.


Now, back to those colored pencils.


If you are interested in making your own version of 
it is available for purchase on my website.


Friday, November 15, 2013

Are You Really in the Ditch? Or Are You Just Riding on the Shoulder?


This variation of a log cabin block is quite dramatic with assorted colors alternating with solid black strips. Each quarter of the block is made individually by starting with a small black square and adding strips on only two sides of the square.  The four quarters are then joined to made the complete block.

In this case, I chose to quilt by stitching in the ditch. There is enough movement happening.  I didn't feel that I had to add more with the quilting.


Often we, as quilters are taught, press the seam allowances to one side or the other.  When we attempt   to stitch in the ditch, we try to stay on the "non-seam allowance" side of the seam. 
We make our best effort to ride the shoulder!

By pressing the seam allowances open, not only does the seam lie flatter but we can actually stitch in the ditch of the opened seam allowance. Our stitches become truly invisible. (Yes, the quilting has been completed in the close-up photo.)


My pillow top quilted with invisible stitches in the ditch.


Another pillow to add to my collection. 
I love the drama of the black vs. color!

May you be blessed with a bright and sunny day.


My pattern "Pizza Box
uses these blocks and
is available for purchase 
Linked to:


Tuesday, March 5, 2013

Are You Ready to Navigate?


Are you drawn to the Mariner's Compass?  Do you have it on your wish list of quilts to make?


I would love to guide you through the process of making your dream mariner's compass using precision paper-piecing methods.


Join me at Sew Smart in Wausau, WI on March 13, 2013. We will be working on my pattern "G.P.S. -  Geese Phying South" which incorporates mariner's compass blocks with flying geese blocks. The class session is from 9-4 and you can contact Sew Smart to sign up.  I hope to see you there.


Friday, February 15, 2013

More Cups and Saucers


Cup and Saucer Tablerunner
16" x 32"
©2012 - Sharon V. Rotz

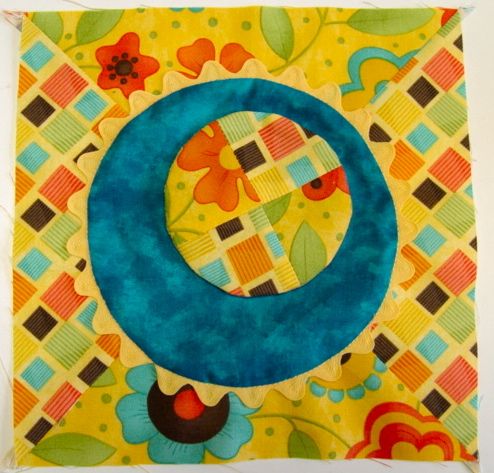
After battling another 5" of new snow, it's time to return to my studio for sewing time. Today, my day is brightened with a cheery tablerunner.  This one uses the same plan as the Cup and Saucer Pillows that I posted last Friday.


After appliqueing the large circle unto the background,


I carefully cut the fabric from underneath the applique.


I then used this fabric to make the small circle that was offset and added to the center of the design.

Now, I think I will find another use for that cup and saucer and fill it with a relaxing, hot cocoa.


Friday, November 2, 2012

Getting it Together and Traveling On


My new quilt is coming together as the background is added and the sections are combined.


Recently, I traveled to Des Moines, IA where we gathered for a class on string piecing.  I enjoyed meeting so many new friends and sharing ideas with them. My quilts loved the opportunity to show off and puffed themselves up with pride as they were displayed during two lectures for the guild. Is it any wonder that they didn't all fit back into the suitcases for the ride home?


We spent one day paper piecing Mariner's Compasses for the center of the G.P.S. wall quilts.


Busy sewing


and trimming.


Anything to get a good picture. 


My friend Mary, who traveled with me and was a valued assistant, myself, and Peggy, who hosted us at her lovely home.


Friday, June 8, 2012

The Wisconsin Quilt and Statewide Shop Hop

The Wisconsin Quilt
48" x 48"
©2012 - Sharon V. Rotz

Capture the beauty of Wisconsin as you quilt your way
 through curving roadways, amid rustling leaves and flowing waters.

Join in the fun of the Wisconsin Shop Hop
June 8-24, 2012

With over 70 quilt shops participating, you have destinations both far away and close to home. There are specials, prizes and fun for all quilters.  Holly Taylor of Moda Fabrics has a designed an exclusive Wisconsin Fabric Line to celebrate the event and I have designed a new pattern especially for you to use this new fabric line. (This pattern is now available at Antoinette's Quilt Shop in Plover WI.)

Choose the Moda Wisconsin Fabric panel and a quarter yard of each of the 15 coordinating fabrics (plus a bit more for binding) and you are set to create your own Wisconsin Quilt.


Quilters, start your engines for  a memorable trip through Wisconsin. Sharpen up your rotary cutters. Oil up your machines and sew away!

And, please, tell me of your Wisconsin adventure and your favorite shop in the comment section below.

Friday, May 4, 2012

Get Creative with a New Pattern

String Breeze
20" x 30"
©2012 - Sharon V. Rotz

I'm proud to announce the release of my newest pattern:  String Breeze

I had so much fun working on this project that I can't wait to share it with you.

The design is off-center with abstract flower shapes and the bright colors jump up and sing. You can use a variety of your favorite fabrics in the string pieced flowers. Rickrack, a sewing box standard, gets a contemporary spin as it flirts its way around the flower edges.

Quilting is done not after everything is in place but first, before there are flowers and leaves to stitch around or starts and stops to make.

The pattern is available to U.S. shoppers for $8.00 plus $2.00 shipping.


Friday, December 30, 2011

Reflecting on 2011


Climbing Roses combines several techniques including string piecing, serged three dimensional flowers, and a flounced edge. 
I was thinking back on 2011 and the quilts I have worked on this past year. While I can think of several of them, others slip from my memory. Do you keep a listing of all of your projects? Or, perhaps you have been working on one that consumed all of your quilting time for the entire year.

Lizard Tails drew the most attention.
A few years ago, I decided to keep a notebook of my projects. The purpose was to document when I started, what fabrics, techniques, etc. that I used. This was a trial for me because I am much more of a doer than a documenter. With some projects, I made excellent notes and others just happened and were out the door before I even thought about noting them. This year, I will again resolve to do a better job of keeping notes.

My serged pillows put a smile on my face every time I look at them.  I love the bright colors and combination of fabrics.

What were the quilts that I most enjoyed making this past year? Which one did I learn the most from? Was it a technique that I learned or perfected (well, hardly perfected, maybe got a little better at)? Was it the creativity that hooked me in? Which project was the most fun making? Was there one that I enjoy using daily? Were there quilts that gave me great joy in giving away?

I'm happiest about all of the quilts our Undercover Quilters group made and donated this year.
Where did your quilting life take you this past year? What joy did it bring into your life?
Related Posts Plugin for WordPress, Blogger...