Showing posts with label pieced blocks. Show all posts

Tuesday, March 18, 2014

I am Conquerer!

Some days you are just in the mood to sew.... 
just for the pleasure of stitching pieces of fabric together. 
Today was a day like that.

Without a quilt design in mind, it was the perfect day to have fun conquering the scrap bag. 
My, there was quite a pile of fabric stuffed in that bag!


I began pulling out fabric strips. Who needs to buy jelly rolls of fabric strips? 
I was amazed at how many strips were stuffed into my bag.

Stitched and pressed, they went from trash to treasure.


I stayed with the brown color theme. 
(That does seem amazing to me, as I can't wait for the colors of spring after this long winter.)

I started to put together some larger pieces, re-cut the strip sets and add them in.


There is still no definite plan as to what I may do with the pieces I've made. Today, it doesn't seem to matter. It is the joy of stitching that drives me on. 


Isn't this fun?

Do you have any suggestions for my pieced sections? 

(If nothing else, the mess is conquered and it will be easier to fold and store.)  


Friday, February 1, 2013

1997, It Was Just Yesterday, Wasn't It?


One year, our quilt guild focused on 30's reproduction fabrics. We made friendship star blocks and exchanged them with fellow members to use in our next quilt. A few days ago, I discovered my blocks hidden in my closet. Hm, the blocks were dated 1997. Could it possibly have been that long ago? 

Why didn't I ever get to making that quilt? Did my blocks have to go through some long seasoning process?  Like aged cheese or fine wine, are they finally at their prime in 2013?

It seems they must be, because I have finally gotten to making that quilt.


There were nine blocks with colored backgrounds, which became the center "9 patch".
How interesting to remember quilters I haven't seen recently.


The blocks with the muslin background formed a border around the center.
I wonder when and if the other quilters finished their projects. Are they still busy making quilts?


 I did find my remaining 30's fabrics. 
It seems amazing after all these years, but apparently, I never throw anything away. 

I cut the fabrics into blocks for a colorful outside border.
Now, I have the quilt pinned and ready to be quilted. What design will look the best?
After making art quilts, will I revert back to traditional motifs for this one?


Thursday, October 20, 2011

Branching Out, It's in the Details

Branching Out
48" x 65"
Sharon V. Rotz

The fun of making a quilt is often in the details. Here are some detail shots of my new pattern, "Branching Out". To purchase, click here.


A spirited fabric enlivens the block while the cute little owls peek out of every corner.


Stop by tomorrow to see what fabrics students chose in a recent class. 


Tuesday, July 12, 2011

Putting blocks together


I've decided to drop the block and add a spacer block at the top of the second row. Instead of making a large quilt with this block (that will come later) I'm going to only use the three blocks I have already completed. 

What can I do now? To balance the larger section on the left, I need to add to the right side. Also, to repeat the three squares in the spacer block, I think I'll add more squares to the bottom right.

What would happen if I just added free floating squares? Obviously, my three blocks are not going to make a bed quilt. This quilt will never be used to keep me warm so I can have fun with the shape.


More of the spacer squares in different border colors will add unity in a free-spirited way. These I will not bind but finish by stitching with the right sides together (batting included) and turning.


When stitching on top of the batting, it seems to work the best to stitch in the same direction. Rather than stitching around the piece, I stitched down both sides and then across the bottom. If there is any stretching in the batting, I am pushing it all in the same direction and there will be less twisting in my final piece.


It's important to trim as much of the batting  as possible away from the stitched edge to avoid a bulky edge.

The  best scissors I have for doing this are not my best scissors but a pair with a rounded tip that doesn't catch in the batting.


When the trimming is done, turn the piece to the right side and press. Obviously, in this case, the quilting will be done after the edge is finished.

Thursday, July 7, 2011

Arranging blocks


I'm now playing with the arrangement of my blocks. I like how they look when I place them vertically.


But I'm not a fan of the horizontal block-to-block setting. To me, the slashed unit on the top becomes too strong and I lose the look of the block.  What do you think?


How about if I drop the block?  Is this more interesting?


Tuesday, July 5, 2011

Where do I go from here?


Today, I'm back in my studio playing with my stripped and slashed units. I've put them together into this block. What do you think?  Do you see possibilities to use this asymmetrical block? Can you see this block put together with different fabrics?

I would like to hear your ideas. Please share your comments.

Come back soon to see the next step I take.

Friday, March 11, 2011

From Strips to Stars

Some of my favorite quilts are star quilts. After some thought, I chose to arrange my half square triangle blocks in a star shape. Immediately, I realized that I would need points and reverse points to keep the strips all going in the same direction. (No, you can't just turn them.) Some days, a little playing before we plunge in and make all of the blocks is a good thing.


Also the center blocks will combine two stripped triangles rather than a stripped triangle and a muslin triangle. Because the strips were random widths the seams are not meant to match. Ha, ha, no stress.


And here we go, arranging the blocks into a star pattern. Because the muslin is light and the seams are more likely to show through, I pressed the seam allowances toward the colored sections as much as possible.  


At this point, we always have to play with the block arrangement to try to get the best coloring distribution. Let's face it, it's impossible to improve it. Too many colors, too many fabric combinations. Let it flow and enjoy it as it happens.


My completed star

Have a little fabric left. What comes next?

Friday, February 4, 2011

And the Pillow Pile Grows


Do you have left over triangles from your project? 

Here are two options for using them to make decorator pillows to match your quilt. After making large flying geese blocks, I had flannel triangles that I cut from the corners. I pieced these together and cut them to size to fit a common pillow form (14" and 18"). These new triangle blocks can surround a large square or be set triangle block to triangle block as in the second example. 


For this pillow, I added a narrow strip of fabric around the triangles to achieve the size I needed for the pillow form.  This narrow strip also gave the illusion of a binding with less work.


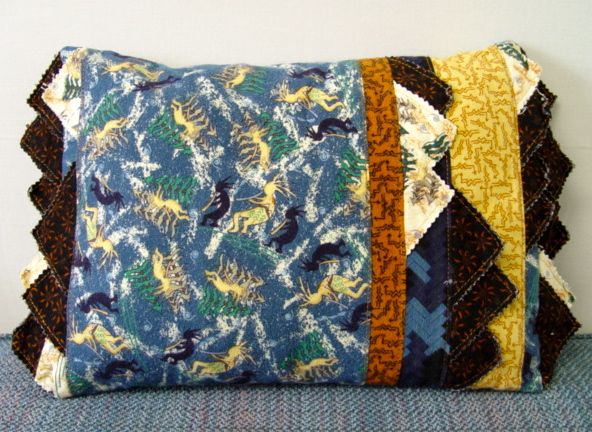
For my third flannel pillow (scraps from a different quilt), I chose to try a pillow with a bit more character. I paired the triangles with the wrong sides together, top stitched the 90 degree corner and trimmed with pinking shears. I tucked these three dimensional triangles into seams on my pillow top and along the  long edges of the pillow. Instantly, a pillow with a jazzed up personality.

The pillow pile continues to grow. How high will we get?


Wednesday, February 2, 2011

More pillows

One lonely block can add a big punch with you make it into a decorator pillow. 

Here, I had extra fabric and made just one more block. After hand quilting it (using muslin as a backing), it became a eye-catching pillow top. A strip of rust fabric was wrapped around cording for the matching piping. A navy ruffle completes the edge. Pow! a great accent for your room.  


Another ruffle-edged pillow was made to match my Tuscanitily quilt. 

The pillow top was cut from a large print fabric and smokey black "ironwork" was machine appliqued around the edge. A narrow border substitutes for the piping, a simple solution to add color to the pillow edge. Again, the pillow top was quilted before the ruffle was attached. The look of a double ruffle can be easy to achieve by stitching together two strips of fabric. (The back strip is wider by 1-1/2" to make a 3/4" overlap unto the front.)

Have you added a ruffle to your latest pillow?

Don't forget to come back for more pillow ideas as my pillow pile starts to climb.

Monday, January 31, 2011

Sparkle Your Decor with Pillows

Snowball Fight Bed Quilt
80" x 94"
Sharon V. Rotz

After many years of working with decorators making custom soft furnishings, I've grown to love the sparkle pillows can give to your room. I thought it would be fun to look at a number of pillow ideas.

A pillow idea can be as simple as making an extra block from your quilt. These pillows named "Throw Snowball Pillows" laughingly refer to what often happens to them in a lively household. An extra block from the quilt border makes a fast quilted pillow top. Add a solid border to size it for a standard purchased pillow form and you can finish in a snap.

The instructions for making "Throw Snowball Pillows", "Snowball Pillowcases" and the "Snowball Fight Bed Quilt" are all in my book, Quilting Through the Seasons.

How have you decorated with quilted pillows?  Share your ideas by commenting to this post.

I'll be back with more pillows, pillows, pillows.

Wednesday, October 20, 2010

A Puzzle, A Key Number and God's Abundance

Whether, it's Sudoku, crossword or jigsaw puzzles, we all love the challenge of solving the problem. Planning the layout for a quilt is just another "puzzling" dilemma; a math problem to be solved.

In the plastic bag was a large pile of black 3" squares. While I used the printed 3" squares on the previous quilt, I saved all the solid colored squares in hopes of combining them with the black squares. Again, I delved into the Undercover Quilters' box and found two solid pieces approximately 1/2 yard each, two narrow longer strips and a bit of neutral brown. These fabrics seemed to loosely coordinate into a color palette.


Finding the key number is the solution to joining these assorted fabrics into a quilt top. Of course, I wanted to go large to make it a quicker finish. Four of the squares pieced together yielded a strip 10-1/2" long (a good size) and would work out nicely as a cut size for a width of fabric. But, my strip of striped fabric wasn't wide enough to cut 10-1/2" squares.

The answer was to change from a square cut into a rectangle 10-1/2" x 8" (the measurement of 3 squares pieced together.) This was a perfect key number to cut large pieces from my 1/2 yard fabrics as well as the long strips. Any fabric remaining from cutting the rectangles was cut into 3" squares to incorporate into the pieced rectangles. This worked out so well, I had almost nothing left to discard.

As I worked to assemble the pieced blocks, I realized that the black 3" squares were cut with a bit of creative license. (This could explain how these pre-cut squares landed in the donation box.) Some I trimmed with my scissors at the machine, a few I had to discard (too small), and others I maneuvered into the blocks. I tried to match corners but --- reality check--- the quilt would be just as warm if the piecing wasn't perfect.

When I started, I was hoping there would be enough to maybe a small lap quilt. What could you expect from a yard of fabric and small scraps? But, like the Lord multiplied the 5 loaves and two fish, He had bigger plans than I did. I found to my amazement there was enough, and just enough, for a twin size quilt top. Should I really be surprised?

After laying out the blocks, it was easy to piece them together as I cheered for my Wisconsin Badger football team, who started out with a bang and hung on to defeat No. 1 Ohio. Hurray!

Oh, so sorry Ohio :(


Wednesday, July 14, 2010

Raspberry Lemonade

Raspberry Lemonade Tablerunner
16" x 44"
Sharon V. Rotz

I love the ever changing seasons in Wisconsin. It has been very warm here and the humidity has been high. I need to get out of my studio and enjoy summer's finest. There are a multitude of things to do in the garden, on the water, or just relaxing on the deck.

I am blaming the joys of summer for my lack of ambition when I think about quilting. I will enjoy touching flannels and cuddle up to some quilt batting when the temperatures dip. Today, when the sun heats up and the flowers begin to droop, I'll lean back in my chair on the back porch. In my hand will be a summertime favorite, raspberry lemonade.

This tablerunner combines delightful raspberry fabrics and soft greens pieced into blocks. With a bit of machine applique, cone flowers are added to the ends of the tablerunner. A bit of rickrack stitched into a seam and machine quilted swags are finishing touches. (This and other patterns are available through my website www.bysher.net)
Related Posts Plugin for WordPress, Blogger...