Showing posts with label applique. Show all posts

Monday, September 15, 2014

My Obsession Continues

My Softer Side
©2014 Sharon V. Rotz

Yes, my rickrack box is not empty 
and I am dreaming up more projects to incorporate my bountiful supply.

Feeling my softer side, 
(usually I pick the brightest fabrics)
I've selected a collection of delicate pinks and greens for this quilt.

The blocks are very traditional quarter square triangle blocks made up on a variety of pink prints. These blocks are set off by a sashing of a soft green stripe. 
On the two-part sashing, the rickrack shines as it outlines the melon shapes.


To make the rickrack trimmed shapes, 
I cut the half melon and stitched the rickrack on the outer edge of the right side of the fabric.


The seam allowance was pressed to the back along with the outer half of the rickrack. This left a finished edge that was easy to appliqué to the sashing by stitching in the ditch 
(the line formed by the folded fabric edge and the rickrack).


A melon shape was appliquéd to each sashing half-strip.


 The two sashing strips were then stitched together and added between the blocks. 

Now that my softer side was had a go, 
my bright side wants to give it a try. 

Will I hold back
 or will the next project be knock your socks off bright? 


Thursday, May 22, 2014

Double Pop


After making my poppies, I tried them on my busy background. The light reflection of the satin weave fabric along with the large area of solid color seem to outshine the background. I think this will work. At least, I will continue on.

I also tried narrow strips of fabric that I printed with a handmade stamp. I like the balance and the interest that these bring to the project.


To add life to my flowers they needed to be connected to the earth. Of course, stems could be drawn out and carefully planned. Or you can fly free and simply cut.


This will work.


Adding the stems and buds and appliquéing them in place.


My completed project. 
Did I accomplish my mission to subdue the diva background?


Friday, September 20, 2013

Out of the Box and into my Hands


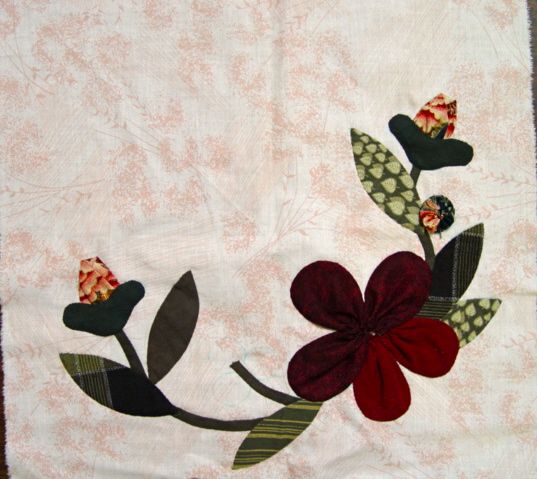
Last week I found a box with the start of appliqued blocks. Of the three blocks I found, this one remained to be finished. Of course, three blocks are better than two so I pulled the extra fabric out of the box and started cutting away. (This is why I packed the fabric away with the blocks so it would be ready to go years later..........and why I find mysterious collections of fabric bagged up in my closet!) 


I completed the flower with a ruched center. I love this method of gathering a fabric strip because it adds so much dimension to a quilt.


A little ruched butterfly, along with a friend, flew into the picture and landed on the top of the block.


Ah, my block is completed. Now I am ready to add some quilting. 
Where did I put those needles?


Thursday, September 12, 2013

Treasure Hunting

So, I'm in my fabric closet and jammed on the end between tubs of fabric is a small white box.
 I wonder what is in there?


Out it comes and I open it to find appliqued blocks.


Oh, these are nice. Why didn't I finish this project? What caused me to wander away? In the box is the book with instructions for a large appliqued quilt but only two blocks are completed. Was it too big of a project to keep my interest or did other things crowd in?


A third block is started. Should I fall back to the original plan? The fabrics are there. The threads are there. The patterns are there.

But, on second thought, if I didn't finish it then, would I finish it now?  Maybe I could use the blocks on a smaller version of the large quilt. Or maybe I should just finish them individually and be done.

Do you have hidden treasures buried in your closet?  Happy hunting!

Friday, October 19, 2012

It's Bittersweet Friday


The trailing vines and bright orange berries of the bittersweet caught my attention several times as I walked along the roadside.  When I was working on Forest Floor, I couldn't resist adding them into the inner border of the quilt.

Forest Floor
©Sharon V. Rotz


This quilt combines solid blocks of a leafy print with my skewed log cabin "freedom blocks".  The bittersweet vines are appliqued with rickrack trim on the berries. 
Instructions are in 

Thursday, March 3, 2011

Bang, Hit the Nail on the Head

I love Sharyn's comment about moving on. Yes, every project that we start does not have to be finished. We can certainly learn lessons along the way and benefit from a start that isn't completed. A smart, logical person would look at this as a lesson learned and get on with their life.

But.........

Just as there are animal rescuer's (my sister), there are crazy, insane quilt rescuers (me). I look at this start as a quilt to be rescued. After pressing, I unpinning the pieces from around the edge. By the way, what a bad idea to leave pins in stored work for rust spots are sure to be part of your future. I was lucky not to have found any. This doesn't look too bad, I still like the fabrics and I have plenty of my favorite, the deep purple Hoffman print.


The little gears in my head are starting to turn. And they are beginning to gather speed. What if I took my few corner applique pieces and placed them like this?


Or like this?


More applique from another fabric? Borders?? So many options to be explored. What comes next? And, there still is that circular file if all else fails.

Wednesday, March 2, 2011

What to Do with the Hole in my Star?

While I had my head in the closet, searching and cleaning, I discovered an unfinished project.  Surprise! Surprise!  Please, tell me you have one hiding in your closet as well.

My project was wrapped up in a bag with assorted fabric to finish it right there. Easy task, right? Roll it out, do a little pressing and I'm on my way.


I remember there was a book on adding applique to a pieced project that I thought was a most creative idea. Mmmm......who was the author? Jinny Beyer, perhaps? Obviously, this was the start of a project with applique done in the center of the star. I see the plan was to add more applique around the points. Two sections are pinned on. There are also two outer corners ready to go.  

No problem, I'll just cut two additional sections for the points, or maybe 6 to go between each of the remaining points. Then I'll find two more outer corners and I'll be ready to sit down and applique.

Unwrapping and sorting the additional fabric, I found one flaw in this great plan. There is extra yardage of all the fabrics, except the one that I needed, the one that was used for the applique. Was there more but somehow it wandered into another project? (yes, you know how that occasionally happens) Or wasn't there ever enough and that was why the project was tucked away?

What do I do now?  Try to come up with another solution or abandon the project entirely? What if I took the applique off? After all, only the center was attached so far. Quick decision was made, yes, that's what I will do.

Well........ until I turned the quilt top over and looked at the back.


I had neatly trimmed away the fabric under the applique. I'm sure it was to eliminate the bulk in the center of the star. Well, that certainly "eliminated" my quick and easy resolution to finishing this project.
Now what do I do?

Do you have any helpful suggestions?

Wednesday, February 16, 2011

Spring Fever


Maybe its the warmer weather we've been having the last few days or maybe its the seed catalog that just came in the mail, but I've been thinking of summer. Last year I captured these marigolds that brightened my yard and I just love the color and the contrast between the shapes of the flower petals and the leaves.

Don't they inspire you? I think a new quilt design could be in the making. Will I find fabric to compliment my vision? Would applique be the best choice or could some piecing be involved? Today, my imagination will fly and maybe tomorrow there will be a sketch and a plan.

What are your suggestions?

Thursday, July 29, 2010

A bright new day

Tall Pines
12" x 27"
Sharon V. Rotz


On this bright and sunny morning, the birds are singing for the tops of the trees. They can't hold in their joy and I enjoyed their song as I walked along.

I thought I would share this wallhanging with you today because it expresses a view of my tall pines. They seem so tall in relationship with the surrounding trees and the bird perched at the tip must feel like he is on top of the world.

For the quilt, I fused strips of fabric on the background for the trunk and then cut small squares for the suggestion of the leaves or pine needles. Some of the squares are fused and some are not providing a play of texture.

I really enjoyed quilting this piece adding both vertical line and horizontal lines and filling in with the fans shapes meandering through the space.


Tuesday, June 22, 2010

Machine Stitched Applique

As I am working on ideas for using my pickle dish blocks in a quilt, I was playing with appliqued stems. In a continued effort to make use of more stitches on my sewing machine, I tried this stitch. It certainly gave a new dimension to the applique. I couldn't see it repeated on both sides of the appliqued stem so I finished it off with two rows of straight stitching on the second side. The thread is a variegated Sulky rayon.

I think I have a winner here. Ah, it feels so good to stretch myself out. I must be up to ten stitches now. Way more than the number of sewing machines I've had. (refer back to to 6/19 - Looking at Stitching Options)

Have you tried a new stitch today or have you found a favorite stitch on your machine? Please, share your thoughts.

Thursday, June 3, 2010

Blowing Soap Bubbles

In a earlier post, I was sitting with a collection of spare parts. It's fun to look at those spare parts with new eyes and play around arranging new combinations. I started with several circles which I added to an established block. For a daring backdrop, I choose a multi-colored stripe. I machine appliqued the bits and pieces to the center.

This all combined into a lively display of color. Pushing myself still further over the edge, I considered a bold circle print for the the border. The more I looked at it, the more I liked the idea. A little narrow black strip framed the center and temporarily stopped the eye. Then on to the border and a narrow orange (with black dots) binding.

This piece is not the for the timid. It's exuberant with excitement. What I thought of was blowing soap bubbles on a hot summer day.

Blowing Soap Bubbles
26" x 22"
Sharon V. Rotz

Today, consider the parts you have left over. How could they be used? You may even create a solution that is more spectacular than your original project.

Wednesday, June 2, 2010

Blast through a Sticking Situation

Spring Poplars
9" x 9"
Sharon V. Rotz


Applique is all about adding layer upon layer of fabric. Hand applique is lovely, traditional, very calming and portable. But it is not quick.

Some days ideas burst forth and I'm in a fury to get things done. Fused applique is my answer and I use it often.

Recently, I was asked what brand of fusible adhesive do I use? In my fusing past, I have tried fusibles only to find they "unfused" if I heated them a bit too long. I have had the sad problem of release paper that didn't release. I have had a fusible adhesive that "fused" to my machine needle leaving it a gummy mess.

Now, I only use Lite Steam-A-Seam and Lite Steam-A-Seam 2 and would recommend it. Not only is it easy to stitch through, I can heat and reheat it to add layers to my project. As they say "The bond is strong and permanent, yet leaves your fabric soft and supple, even with several layers of applique."

Fusible adhesive may not be showy, but you will love it when it hugs your fabric and keeps it secure.
Related Posts Plugin for WordPress, Blogger...