Showing posts with label Clover quilting tools. Show all posts

Tuesday, June 19, 2012

Tuesday's Tile - Mariner's Compass

Quilter's Tile - Mariner's Compass
8" x 8"
©2012 - Sharon V. Rotz


For small projects, I like to use a single layer binding. Commercially packed bias tape could work, but I prefer to coordinate the binding by using a fabric from the center of the quilt.
  

The Clover Bias Tape Maker works well for folding a binding strip. Both bias and straight grain fabric strips may be used. (I usually use straight brain strips for my bindings.) 

If the corners of the fabric strip are trimmed off, it is easier to start feeding the strip through.


In it goes.


The fold is started and my iron presses it in place as the strip feeds through the bias tape maker.


Out comes a beautiful, coordinated binding strip.


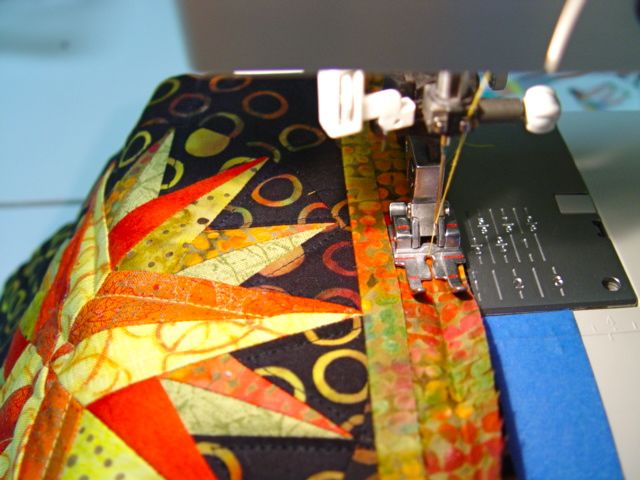
The unfolded strip is stitched to the edge of the quilt. The fold line guides my stitching.


The binding is folded around to the back of the quilt, ready for hand stitching.


Tuesday, January 10, 2012

Tuesday's Tiles - Punch Patch Posies

Quilter's Tile - Punch Patch Posies
8" x 8"
©2012 - Sharon V. Rotz


Since I had all of the tools close at hand, I thought  I should try another method of needle felting. It is also possible to needle punch patches of wool cut from wool fabrics.

Here I made a simple quilt using patches cut from scraps of wool clothing fabrics (clothes that I had made, not that I was wearing, altho...)


I dug into a long lost bag of yarn and found wool yarn left from a crewel embroidery project, a beautiful piece that my mother-in-law had made. I remember it hanging in her house at the top of the staircase. (Now, lucky me,  I have it hanging in my studio.)

I cut yarn strands about a half inch longer than my background and punched them in. Oops. They shrunk up quite a bit, I wasn't counting on that happening.  I now know they should be much longer.


Here you can see the back of my background fabric with all of the punches coming through. This side also presents possibilities. Oh good, another quilt will soon be dancing in my head.

What do you see?

Tuesday, January 3, 2012

Tuesday's Tile - Flower, I Felt


Quilter's Tile - Flower, I Felt
8" x 8"
©2012 Sharon V. Rotz

A cold day in January and a wish to stay warm led me to trying a new technique (for me). It was time to pull out the 'warm' wool roving (strands) I had stashed and find a bit of wool to place them on.  I had gotten the wool from Peggy Yates of Peaceable Acres Farm Fiber Arts after visiting her and her adorable  sheep one warm summer day.

It was then time to open that Clover Felting Needle Tool and have some fun punching the roving into the background wool. It is amazing how easy it is, love those barbed little wool fibers that hook together so nicely.


Now that my wool was hooked, it was easy to machine quilt over it creating my flower. The thread was 30 wt Sulky Blendables variegated cotton thread which showed up beautifully on the roving. I then added size 8 Miyuki seed beads and Kreinik Metallic 1/8"ribbon on the edge.


Aren't you impressed that I made notes of all of these things? 

I am. 

(You see, I am trying to keep that 2012 resolution to make better notes.)

Friday, November 18, 2011

Finished, at last and in the spotlight


As I walked into my studio this morning, the sun was coming through the window and there in the spotlight was my blue broken star. I had just completed hand stitching the binding last night and now my finished quilt was shining in all its splendor. Finished, at last.


Today, I want to share with you the method that I used for the binding.


First I cut strips of one of my coordinating fabrics, piecing as needed to get the length. I make enough to got around the quilt plus at least 6 inches extra. Because this quilt has an uneven edge, I allowed a bit  more.


I fed one end of the strip through a Clover 18 mm ( 3/4") bias tape marker.


I pulled the bias tape maker along and pressed the strip as it came out.


Then I opened one side of my coordinating tape and stitched it to the quilt edge for a binding. This strip was then folded around to the back of the quilt and hand stitched to the back.


Blue Broken Star 
44" x 44"
©2011 Sharon V. Rotz

The basic pattern for a broken star quilt is available at my website.

How will you make it your own?

Related Posts Plugin for WordPress, Blogger...